The importance of posture training in dance lessons
In my many years of teaching experience I’ve seen time and again that students tense up in a wrong way when trying to build their body posture for dance. If this kind of over-tensed posture is regularly trained the result is pain that has to be alleviated with massage, baths or even pain relieve plasters. The most common hardening of muscles is in the shoulder area and in the lumbar muscles at the back, but also in the neck. Therefore, it became clear to me in my teaching routine that the Bharata Natyam student must understand from the beginning how to distinguish bad muscular tension from good tension. This is only possible if the student learns to build up a correct body posture.
The body posture in dance depends on the natural posture that students have in their everyday life. If somebody has a hollow back in her daily body posture, she’ll automatically increase it when she tries to give her body more tightness in dance. Muscles that are already tight are put under even more tension. It feels like building up a taut dance posture, but it actually works against a healthy dancing posture.
Typical posture instructions in dance lessons that students often hear are “straighten your back!”, “Chest out!”, “Shoulders down!”, “Pull your belly in!” etc. However, this is not a correct and step-by-step guide on how to build up a posture for dance. Maybe some dance teachers don’t want to bore or overwhelm their students with more detailed posture instructions. Posture work can be tedious and requires patience. If the student is already an adult who has become accustomed to her posture over the years, It’s even more difficult. This can tempt some teachers to entertain the student with a few dance steps first until the body coordination is sufficiently developed. Only thereafter they plan to work on the upper body straightening because it can probably be done at a faster pace. But nothing is more difficult and frustrating than correcting an incorrectly accustomed posture.
There are also teachers who are convinced that dance training automatically brings the body into the correct alignment. Unfortunately, as I know from my own teaching experience, this is also seldom the case. An untrained body always chooses the path of least resistance. Muscles that are already strong become even tenser and the untrained muscles become overtaxed. This prevents them from getting stronger. Painful knots in the muscular structure are therefore inevitable. This is not always evident from the outside. From the outside, for example, a shoulder area can appear wonderfully balanced, and only the gnawing headache of the student after a few weeks indicates a stiff shoulder area that has continuously built-up tension and hardened due to incorrect posture in the dance class.[2]
In this context, there’s another typical problem that I’ve observed especially with very flexible girls. Due to their great flexibility, their body does not limit them if they overstretch certain parts of the body or tense them too much. The physical tolerance range of such students is so broad, that a teacher can easily overlook their issues. The agility of these girls turns out to be a hidden enemy, because it may be that they’re able to dance wonderfully for years with a wrong body tension without ever experiencing physical discomfort. I will explain in a separate section why and how to pay special attention to hypermobile students.
Basic knowledge of theory
As I already explained in my blog on breathing, it’s essential that the teacher has a basic understanding of human anatomy. She or she must understand how the straightening of the body for dance works and how to guide the students. Outdated schemes such as the “straight back” or the instruction “stretch yourself!” should be deleted from any teacher’s vocabulary. Such instructions produce completely wrong associations and confuse students. If a flexible girl stretches herself out, it usually ends in a strong hollow back and an overstretched chest. The error can be seen in the profile. An overstretched back is shaped more like a banana and has absolutely nothing to do with an “elongated” and “stretched out” upper body. The so-called straight back is an anatomical absurdity. Anyone who has ever studied the profile of a spine knows that it can never become “straight” in the geometric sense, so why to use this instruction in the first place?!
A healthy spine describes a gentle S-curve that has its meaning and purpose. The support function of this S-curve can be optimized by giving the spine the correct length it needs. It’s precisely this elongation that we strive for in dance. Therefore, the correct instruction here is to “extend” oneself. Only this word arouses the right association in the student, no matter if beginner or advanced. Just asking (without directions!) that the student should extend their posture toward the ceiling will cause them to try to grow. The student will neither stiffen nor overextend the natural curves in the spine but will try to support and hold the upper body. Like this, it takes less explanation for the teacher to make the students understand that this is the only right way to build a healthy upper body posture.
POLE PRINCIPLE
It’s my belief that the posture in dance should contribute to our physiological health in everyday life. In my experience, very few people exhaust the potential of an upright upper body posture in their everyday life. In dance, however, an upright posture is elementary and a prerequisite for everything else. For this reason, what students learn in dance lessons about posture, they should be able to transfer to their lives outside the dance hall.
The pole principle is the core idea I follow here. The pelvis and head represent the opposite poles between which the spine is laid out. Between these poles, the spine should be able to develop its optimal support function. Optimal means that we want to use the potential of the spine to elongate our upper body. Both the pelvis and head have the ability to rotate back and forth. By tilting the head back and turning our bottom-up, we compress the spine. By turning our head forward and lengthening our neck, and by letting the bottom sink downwards, we feel that the spine is lengthening.
This relationship between head, spine, and pelvis can be explained to the dance student with simple self-made models. I usually use two round objects for each pole, such as two small exercise balls, and place them on the dance floor with a distance of about one meter. In between I shape the Theraband® in a slight S. That’s the spine. If you turn one ball (or both) and keep the halfway wrapped around Theraband® moving with it, the “S” in between the poles vanishes or piles up. This illustrates what happens to the spine. With the help of this simple two-dimensional model, I’ve so far been able to explain to every dance student – including children – the positive outcome of getting an elongated spine (because a smoothly stretched Theraband® looks much better than a crumpled one). With such a model, It’s possible to explain exactly what one has to do without much theory. The most important point in this principle is that the balls – that’s, the pelvis and the head – rotate, they don’t shift, tilt, or lean. This can be made clearly visible in the model described above.
The following exercise suggestions build on this basic knowledge. The dance student must have understood the causal relationship between the head and the pelvis, otherwise, these exercises have only minor effects. The exercises are nothing more than a step-by-step elongation and an application of the pole principle explained here. It’s important that the teacher looks at the requirements of her students. For example, someone who tends to have a hollow back in their everyday posture has to turn their pelvis more forward than someone whose lumbar spine has already the appropriate length.
Important: Be careful with anything that requires direct work with the spine. I’ve great respect for the responsibility that our bodywork as dance teachers entails. As a dance teacher, you have to be able to recognize certain posture schemes (flat back, hollow back, scoliosis, etc.) in order to give the correct instructions and not to cause any damage. That’s why I repeatedly point out the following: Educating oneself on human anatomy is a must for every dance teacher!
Pelvic exercise
In a first exercise, we explore and discover the ability of the pelvis to rotate. The pelvis can be turned back and forth in a lying, sitting, or standing position. However, the student needs to understand the principle and shouldn’t simply unwind an exercise instruction. It’s important that one imagines the transverse axis through the pelvis. To do this, I ask the students to put their fists on the right and left sides of their hips, as if they were holding a rod that goes right through their pelvis from right to left.
This is the movement that’s sought in the following exercises:
- In the lying position, you can demonstrate the effect of the different pelvic positions particularly well. If you turn the pelvis very downward, a strong arch is formed in the lumbar area of the spine. You can practically reach through with your hands between your back and the floor. If you turn the pelvis upward again, this arch closes and your back lies almost flat on the floor.
- In a sitting position, you can feel the ischial tuberosity particularly well, the two bottom-facing tips of the pelvic bone. If you put your hands under your bottom while sitting, you can feel it very well. Have the students imagine that a beam of light shines out of the ischial tuberosity onto the floor. This light beam must now be directed forward or backward. If you have sitting balls in the dance studio, this exercise can also be done on them. In that case, turning it back and forth is even easier.
- In a standing position, you should stand in front of a mirror. Once they practiced that, they can try turning the pelvis while standing in the various basic dance postures. Once they practiced that, they can try turning the pelvis while standing in the various basic dance postures.
In all three variants, I end the exercise with the student looking for the midpoint of both pelvic postures (extremely frontward and extremely rearward). It’s very interesting to see what the midpoint would be in terms of posture and what the student perceives as her subjective midpoint. For people who tend to have a hollow back, for example, the midpoint is closer to the hollow back because this posture is comfortable to them. This subjective feeling must be corrected. The student has to build a new feeling for her posture. The more often the exercise is repeated, the more comfortable they’ll feel with the correct midpoint position of the pelvis.
Head exercise
The next basic exercise deals with the ability to turn the head. Basically, it’s identical to the pelvic exercise above. First, the student imagines a rod going through the head, from one ear to the other ear. If it helps, ask them to put an index finger to each ear as if they were wielding the rod.
- In the lying position, the effect of the different head positions is particularly well visible. If you turn your head frontward, your neck spine extends and lies almost flat on the floor mat. The chin approaches (but does not touch!) the collarbone. If you turn your head back again, an arch arises in the neck. The cervical spine lifts off the floor and compresses.
- Here you can also easily observe a faulty head rotation. Turning the head rearward shouldn’t cause these problems. It’s very easy for most students and gives instant relief. In my experience, many people have an everyday posture with a slightly shortened neck.
- In a standing position, you should stand in front of the mirror. As an advanced exercise, you can try the turning head position while standing in the various basic dance postures.
Straightening through the head and pelvic movements
In this last step, you can work indirectly with the spine by combining the head and pelvis. You have to work in different steps so that the student learns to slowly build up the straightening.
Step 1:
The student stands in front of the mirror in samam. The feet are together, the hands are propped up on the hips, the eyes look straight out, the elbows look to the side and are not pushed back.
Step 2:
First, the head is brought into the correct position. Have the student find the length of the neck by turning their head frontward until they reach the desired position. A few checkpoints help to find the right posture:
- The eyes look straight.
- The chin is at a 90° angle to the floor.
- Imagine a ray of light shining out from the top of the head. It should shine straight ahead on the ceiling.
Step 3:
The attention now switches to the hip. The pelvis rotates in the direction that elongates the spine. In most cases, this is a turn towards the ground. You can usually feel and see that after this rotation the curve in the lumbar region of the back flattens out. The posture of the pelvis can only be maintained if the entire trunk and pelvic floor muscles are activated.
The student should linger for a moment in the new, upright posture. She should become aware of her body tension. She breathes calmly and regularly. All in all, the student will realize that the alignment of the head and pelvis has not only resulted in an elongated spine. The entire upper body is now aligned to support and maintain the posture adopted. The abdominal muscles are active, the pelvic floor is working, the shoulders are relaxed, the neck is long, the gaze is focused, the chest has ideal conditions for breathing. This is the desired muscular tension – without cramping – which must also be maintained in dance. Such a balanced body posture cannot be achieved by simply tensing individual muscle groups (e.g. stomach or buttocks). The back also does not get the length that it achieves through this step-by-step instruction. In this context I teach my students an important principle: Tension and relaxation go hand in hand!
Body posture in dance is not only achieved through excessive muscular tension. Stability through abdominal muscles, for example, can only develop its full potential, if the lumbar muscles are stretched or lengthened accordingly. In order for the chest to develop its full posture potential, the shoulder muscles must be able to relax.
With an appropriate strengthening of the entire body, be it through strength training or the dance lessons, this type of posture build-up in the upper body of the student will not only give more stability but also more expressiveness and generally a healthier posture from which they will also benefit in everyday life.
BODY POSTURE IN CHILDREN
The instructions described above for an elongated upper body posture with ideal muscular tension are only applicable for children above the age of 9, or even later. You need to have good body control, you need to be able to isolate certain movements of the body and to follow an abstract movement instruction. This is generally not the case with children below 9 years.
However, that doesn’t mean that children cannot or shouldn’t be sensitized to the subject of body posture. On the contrary, there are great games and exercises to do with children. Most of these exercises are a good kickstart for the lesson and at the same time teach them how muscle tension feels as opposed to muscle relaxation. It depends on the age of the children and the lesson structure of the teacher on how explicitly you address the topic with the children. Sometimes the kids are just not in the mood for long lectures about anatomy and muscles. It’s therefore advisable to simply string exercise after exercise and let the body learn the unconscious way. But often children are very interested in their bodies and how it works. One should definitely use such situations to bring the topic closer to them. There are very simple examples for this. Immediately there’s a competition as to who has the strongest muscles. Since you can recognize and feel the biceps even in younger children (and every child has a visible biceps from playing so much), you can explain very easily what a tense muscle is and how its size relates to its strength.
Here are a few examples of exercises that I use over and over again in the dance class to sensitize the children about body posture and to prepare their spine for a later systematic straightening. There are many approaches and an infinite number of exercise ideas. I name the most important approaches here, each with an exercise example:
Elastic back, pelvic mobility
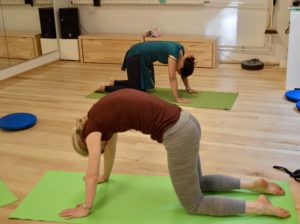
A classic exercise is «humpback of a cat/howling wolf”. The children prepare themselves in a four-legged stand. First, let them shape their back into a rounded hump. Tell them to incline their eyes downwards. Also, support them by asking them to actively push their navel towards the ceiling. This automatically activates the abdominal muscles and turns the pelvis a little further. To do this, tell them to let their back sag (please make sure that it happens slowly) and to put their head back with their face towards the ceiling. It’s clear that both postures are accompanied either by loud meowing or yowling. But otherwise, it’s no fun! After switching between the two positions several times, I usually ask the older children to look for the middle between the two positions and to internalize it.
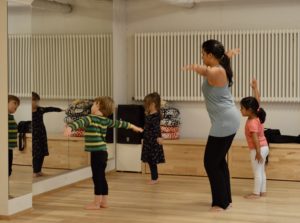
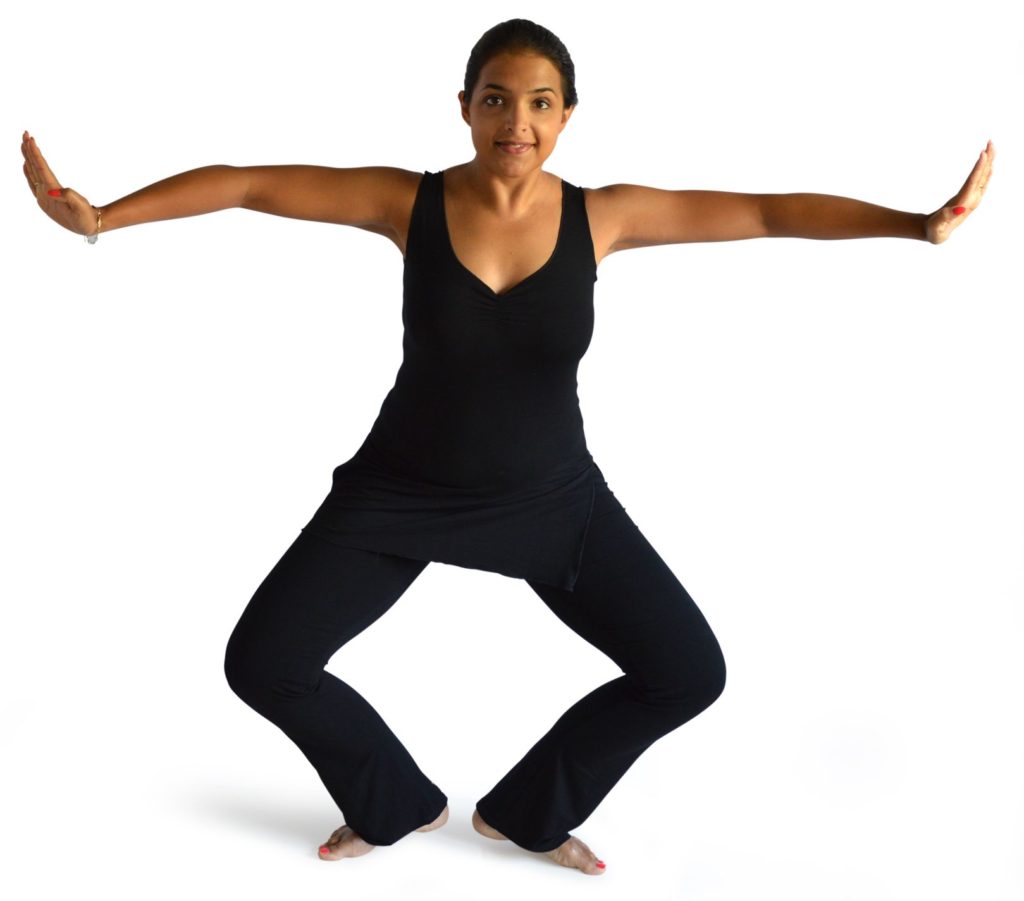
Body posture and the tree trunk
A thick and solid tree trunk is a good image for working towards a strong and stable body center. In the most important basic posture of Bharata Natyam, the Ardhamandali, this exercise is a little more effective than standing. But the exercise can be done in different postures. The children stand in front of the mirror and spread their arms. They imagine they’re a tree, a gnarled old tree with roots that reach deep into the ground. They’re firmly anchored in the ground. Their body trunk is the tree trunk. Now comes a storm, the wind is strong, the branches in the tree are moving back and forth. But the trunk of the tree remains firm. You can build a whole story around this exercise. It’s important to imagine the branches, that give way in the wind, and the trunk, that remains as it is despite a strong storm. The children can check their movements in the mirror. This is an incredibly effective exercise.
Head mobility
The head usually needs more relaxation than muscular tension. Nowadays even the younger children are a little stiff in the neck and shoulder area. So, I’m doing a relaxation exercise here. The exercise can be done while sitting or standing. They let their heads hang and imagine that it’s a large, heavy church bell (it could be something else, but it should definitely be something large). The children imitate the sound of such a bell and swing their heads back and forth. Please guide this exercise very carefully so that the children do not use too much force. The goal is to relax the neck a bit and to stretch the muscles at the same time.
Relaxation – tension
For younger children, “tension” and “relaxation” are too abstract; they can rarely carry out instructions related to these keywords. The following exercise teaches them through play. A timely social event, such as Easter or Christmas, is best because you can combine the exercise with it. The children imagine they’re made of chocolate, depending on the season, Santa Clauses, or Easter bunnies (in summer you can also use an ice cream). Now they’re standing in the blazing sun and they slowly melt away. Before doing the exercise, you should briefly discuss with the children that the part that’s closest to the sun naturally melts first. This gives the children an idea of where to start. The legs give way last. In the end, they melt into a puddle of chocolate on the floor. With music, the exercise is even more fun and the children will want to repeat it over and over again. To do this, we put the melted chocolate back in the refrigerator, where it becomes solid again. And the game starts all over again.
Such and similar exercises help children intuitively internalize various aspects related to body posture and back posture and later reduce the risk of extreme tension or incorrect posture patterns disturbing their body posture in dance.
[1] I am dealing here with body posture in terms of a healthy back posture. This mainly applies to the upper body. Body posture in the legs is discussed in a later blog, which deals with the correct leg axis. In general, however, in dance, I mainly relate body posture to the upper body.
[2] Of course, other aggravating causes often play a role here, such as long working hours at the computer or other work in a monotonous posture that strains the body unilaterally.
Note: The movement concept of Spiraldynamik® has proven itself to me as being a vital support in dance and in teaching. Therefore, in many places in my blogs, I use know-how that I’ve acquired through my training in Spiraldynamik®, which I’ve successfully applied in practice.